One of the most common issue we encountered most specially for system administrators is running out of disk space. For us to solve this issue its either we extend the size of our disk or add a separate drive. Adding separate drive is more convenient as we can transfer some of the large files from the root partition to free up disk space.
In this tutorial we demonstrate how to add additional drive on Ubuntu.
Let us start adding our new drive.
1. Check Available Device On Our System
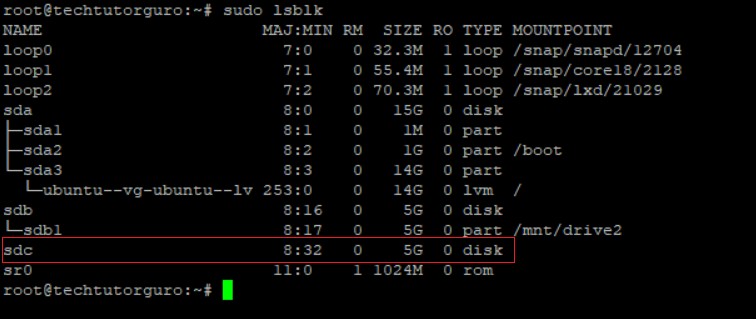
To list the device block run this command.
sudo lsblk
We will add the block device “SDC” as a new partition.
2. Removing Current Partition Signature
Sometimes the hard drive we attached to our server came from computer with existing partition signature like for Windows Operating System the NTFS filesystem. Before we can proceed with partition part we need to remove the current partition signature of the device block.
To that run this command.
Note: Please be careful with drive path and make sure it is the right drive path, in our case it is “/dev/sdc”
sudo wipefs -a /dev/sdc3. Partitioning The Drive
In this part we will only create one partition. Let us start to create the partition.
In this part we will use the tool/command “gdisk“. Let us partition the block device by running this command.
sudo gdisk /dev/sdcOutput:
GPT fdisk (gdisk) version 1.0.5
Partition table scan:
MBR: not present
BSD: not present
APM: not present
GPT: not present
Creating new GPT entries in memory.
Command (? for help):n # Type n then enter
Partition number (1-128, default 1): 1 # type 1 then enter
First sector (34-10485726, default = 2048) or {+-}size{KMGTP}: Just press ENTER
Last sector (2048-10485726, default = 10485726) or {+-}size{KMGTP}: Just press ENTER
Current type is 8300 (Linux filesystem)
Hex code or GUID (L to show codes, Enter = 8300): Just press ENTER
Changed type of partition to 'Linux filesystem'
Command (? for help):w #type w then enter(write the changes)
Final checks complete. About to write GPT data. THIS WILL OVERWRITE EXISTING
PARTITIONS!!
Do you want to proceed? (Y/N):Y # Type Y then press enter
Final output:
OK; writing new GUID partition table (GPT) to /dev/sdc.
The operation has completed successfully.
We have successfully created our partition.
4. Creating a Filesytem
Since our partition is now ready we need to set the filesystem of our block device. Since “EXT4” is the default filesystem in Linux we will use the EXT4 for our block device. To create the filesystem for our block device, run this command.
sudo mkfs.ext4 /dev/sdc1Notice that the block device is now /dev/sdc1 it is because we created only 1 partition.
Output:

mke2fs 1.45.5 (07-Jan-2020)
Creating filesystem with 1310459 4k blocks and 327680 inodes
Filesystem UUID: 22d496b8-024d-47d4-9cf8-8f740be1cc79
Superblock backups stored on blocks:
        32768, 98304, 163840, 229376, 294912, 819200, 884736

Allocating group tables: done
Writing inode tables: done
Creating journal (16384 blocks): done
Writing superblocks and filesystem accounting information: done
5. Creating a Mount Point
At this point we need to create a mount point for our block device. We will create a mount point in /mnt directory. Let us create our mount point. First let us change directory.
cd /mntWe will call our mount point “mydrive”.
sudo mkdir mydriveNow let us make our mount point immutable this is to avoid the scenario when or storage drive does not mount and we don’t want our files to be save on our drive where the operating system is mounted.
To make our mount point immutable, run this command.
sudo chattr +i mydrive/6. Mounting Our Drive
Since we are done creating the mount point let us mount our drive. To mount our drive we need to identify first the Universally Unique Identifier(UUID) of our block device /dev/sdc1. Using the UUID is the recommended way to mount our drive. To check the UUID, run this command.
sudo blkid
Copy the UUID of your block device in our case it is /dev/sdc1 an open /etc/fstab. Let us open fstab and register our mount device.
sudo nano /etc/fstabadd the following at the bottom of the file.
UUID="22d496b8-024d-47d4-9cf8-8f740be1cc79" /mnt/mydrive ext4 defaults 0 2Save the file and exit.
The /etc/fstab file should look like this.

To apply the changes we need to run this command.
sudo mount -a7. Verifying the Mount Entry.
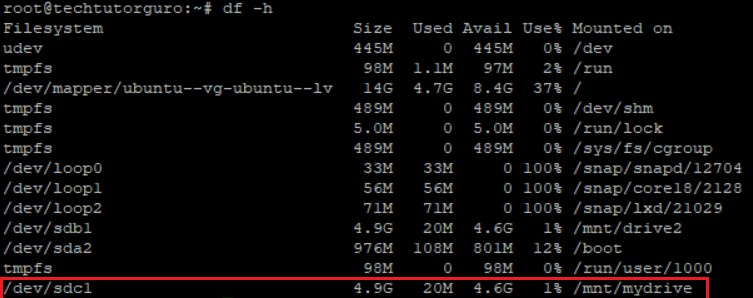
To verify if the new drive is added to our system, run this command.
sudo df -h
That’s it we successfully add a new partition drive to our Ubuntu System.
Conclusion
You have learned how to add a partition drive on Ubuntu 20.04. If you like this article you might like also our other articles on this site.
If you have questions, feel free to leave a comment and we will try to answer it.
Thank you and hope you enjoy our tutorial ?


